This is a mirror of a campaign update originally posted on CrowdSupply.
Hi there!
In this week's update, I'll be talking about the thing you have to talk about if you've made an audio device: the design and quality of Tangara's audio output.
I don't like just throwing out a bunch of very technical measurements and hoping people trust they're good, so I will also give a very brief introduction to audio quality measurement in general. I'll then go through a neat little hack you can do to Tangara's audio chain to improve compatibility with cheap, sensitive IEMs.
Tangara's Audio Design
Tangara's audio chain is designed to perform well with both average and high-end headphones, whilst also being easy to understand and modify.
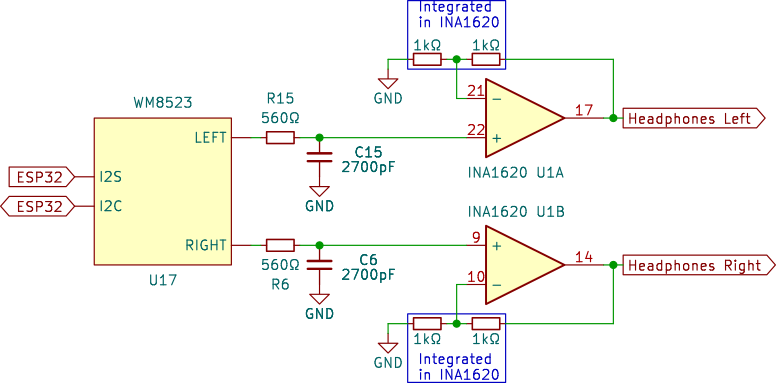
We start with our digital-to-analogue converter (DAC), the WM8523 (and its recommended output filter). The DAC takes the raw digital audio samples and converts them into an audio signal. The WM8523 in particular is a fairly cheap device -- its specifications may be unexciting to folks craving the absolute best performance numbers -- but in my opinion this DAC's performance is good enough that any deficiencies with it are inaudible to human ears.
Where we've chosen to spend money on high quality components is with Tangara's amplifier: the INA1620 (for nerds, it's an OPA1622 with integrated resistors). I selected this amplifier due to its fantastic features when used as an output stage:
- It provides a very well-matched +6 db of gain on each channel, for better compatibility with high-end headphones.
- Its 140 mA maximum output current is more than enough for the kind of headphones you would want to use with a portable device.
- Its output is very consistent across a wide variety of loads; many cheaper amplifiers have issues with distortion as you approach their power limits.
- Power-on pop and click elimination and shorted output protection built-in make implementation very simple. Other amplifiers might be cheaper, but then end up needing a larger amount of supporting components.
By using such a sophisticated amplifier, we've made it very easy to hack on the audio chain of Tangara without compromising the quality of your output. Whether you're replacing the DAC, dampening the signal for a lower noise floor, or adding an alternate source such as an FM receiver, the INA1620 makes for a great, stable front-end between Tangara's audio source and your headphones.
Now that we've examined what Tangara's audio chain is, we can talk about how it performs. AES17 is the Audio Engineering Society's standard for characterising audio devices, and the metrics that tend to be of most interest are "total harmonic distortion and noise" and the "signal to noise ratio".
Total Harmonic Distortion and Noise (THD+N)
THD+N is, very broadly speaking, a measurement where you play a test tone at a specified frequency, then filter that tone out of the recording. The resulting signal is a combination of any distorted elements of the test tone, plus any background noise. The difference between the level ("volume") of this resulting signal, with the level of the original test tone, represents how much of a device's audio output differs from a "perfect" reproduction.
THD+N is often presented as a single number, either as a percentage or a decibel (dB) value. This presentation is quite difficult to reason about, for a number of reasons:
- A device's THD+N typically varies depending on the output level. For example, our WM8523 DAC's datasheet shows that its THD+N at its maximum volume is slightly higher than its THD+N at 1 dB below its maximum volume.
- The exact test setup can have a very large impact on THD+N measurements. For example, it is possible to perform the same test with an unloaded output, a 32 ohm load, or a 10k ohm load, and end up with very different numbers (and not all manufacturers disclose their exact test setups).
- Whether or not a particular THD+N statistic is actually audible is incredibly difficult to determine; it depends on the exact nature of any distortion, as well as whether the distortion or noise component is dominating the calculation. At high volumes, the distortion will tend to dominate. At low volumes, the noise will tend to dominate.
I measured Tangara's THD+N using a Cosmos E1DA ADC, with a load of 600 ohms and a variety of different volume levels:
| THD+N | dBFS | Volume %* |
|---|---|---|
| 0.015% | 0dB | 87% |
| 0.014% | -1dB | 86% |
| 0.014% | -10dB | 78% |
| 0.022% | -20dB | 68% |
| 0.066% | -30dB | 58% |
| 0.150% | -40dB | 47% |
| 0.480% | -50dB | 37% |
| 0.185% | -60dB | 27% |
(*The highest 13% of Tangara's volume meter is used for digital gain.)
From this we can see that, as long as your headphones reach a comfortable volume above 47% of Tangara's maximum volume (equiv. to 60% consumer line level), there should not be any perceptible noise or distortion. But, what about more sensitive headphones that are only comfortable to use below this level? To address these, first we need to talk about signal-to-noise ratios.
Signal-to-Noise Ratio (SNR)
SNR is a measure of the difference between the loudest sound a device can produce, and the loudest noise present when not playing anything (or more specifically per AES17, the noise present when playing a -60 dBFS test tone). This is an important metric for understanding audio devices, as it gives an indication of how much listenable volume a device has before you will begin to hear the background noise inherent in every device (the "noise floor").
Your ears have an effective dynamic range of about 70-80dB before you begin to damage your hearing. Tangara has an SNR of 106 dB. But how do you compare these numbers? Does Tangara's wider range mean you won't hear any background noise? It's difficult to answer this without knowing the characteristics of your headphones; particularly the SPL (sound pressure level; usually measured in decibels per watt, or sometimes decibels per volt) and impedance (usually measured in ohms).
A full explanation of these characteristics is beyond the scope of this post, but at a very high level you can put most headphones into one of three categories:
- "Easy to drive" headphones that are neither particularly sensitive, nor particularly high fidelity. Most non-audiophile headphones are in this category.
- "Easy to drive" headphones that are highly sensitive, but also high fidelity. Most IEMs (especially the cheaper ones) are in this category.
- "Difficult to drive" headphones that are less sensitive, but high fidelity. This category includes the bulk of what you might call "high-end" gear; everything from fancy studio headphones to expensive planar IEMs.
The second and third categories are the most problematic, as they have contradictory requirements.
Highly sensitive headphones need only a tiny amount of power to produce sound, which makes them susceptible to high noise floors. To support these devices, it's best to use your available SNR at the low end (by applying damping, then running your DAC at a higher volume), in order to keep the noise floor below an audible volume.
"Difficult to drive" headphones, on the other hand, will rarely pick up a device's noise floor. They may, however, struggle to produce sound at a loud enough volume to be well audible. To best support these devices, it's best to use your available SNR at the top end by applying gain, so that you have enough headroom to increase volume before you run out of power.
Ultimately, when designing a device like Tangara, you have three options for what to do with your dynamic range:
- Use it for top-end, giving people with high-end headphones the best experience.
- Use it to lower your noise floor, giving people with more sensitive headphones the best experience.
- Use a substantially better DAC, increasing the cost of the device.
For Tangara, we chose option one. First, because we didn't want to further increase the cost of the device with an expensive DAC that most users won't get value out of. Second, because lowering the noise floor post-hoc is a much easier modification to make than adding more amplification.
A Hack for Budget IEMs
There is a whole market these days of cheap, high-fidelity 'in-ear monitors' (IEMs; they're fancy earbuds). You can typically find them for $20-$40, and they sound great.
The main downside of this style of headphone is that they typically are overly sensitive; often able to pick up and make audible the noise floor of even very good DAC implementations. You will hear this as a very quiet 'hiss' or white noise during quiet pieces of music.
It is difficult to provide a good experience for this kind of device without either spending more money on a more advanced DAC chip, or adding complicated circuity to modify your amplifier's gain (both upgrades that are wasted when paired with higher-end headphones).
Tangara's noise floor is audible through such devices; although it's quiet enough that most of the team could only hear it when I coached them into what to listen for and then played back pure tones through various other devices. It's therefore probably good enough for you.
If you're a real audio head, and this isn't good enough for you, then soldering two small resistors is an easy mod that will shift the whole signal down. You can then listen at a higher volume, without an audible noise floor.
Referring back to the schematic for Tangara's audio chain, pay attention to the region between the DAC's output filter and the amplifier's input.
This is a tremendously good location for implementing all kinds of modifications. In this example, we're going to add some small resistors from the signal path to ground. This will attenuate the entire signal -- including the noise floor. We can then set the volume level higher to compensate for this, resulting in audio output that is still loud enough to listen to, but with greatly reduced background noise.
This is the same principle as devices like the iFi iEMatch. However, because Tangara is an open source device constructed with hand-solderable parts, it's very practical to implement this solution completely internally. This avoids a bulky extra dongle, and also eliminates any chance of affecting the frequency response of the output.
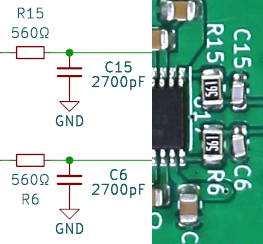
In our case, we're going to solder one 0603 resistor per channel, on top of C15 and C6.
This creates a voltage divider together with the DAC's output filter resistor and the input impedance of the amplifier (which I've simplified into one resistance value. Don't worry about it!)
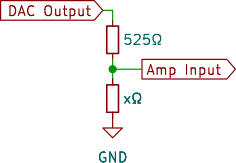
We can then make an equation to find the damping amount provided by various resistor values:
20log10(x / (525 + x))
| Resistor | Damping (approx) |
|---|---|
| 650 | -5dB |
| 250 | -10dB |
| 100 | -16dB |
| 60 | -20dB |
| 16 | -30dB |
In my case, I wanted to use a pair of Salnotes Zeroes. These felt comfortable at around 30-40% volume, so I used a 100 ohm resistor to bring the noise floor down by 16 dB.
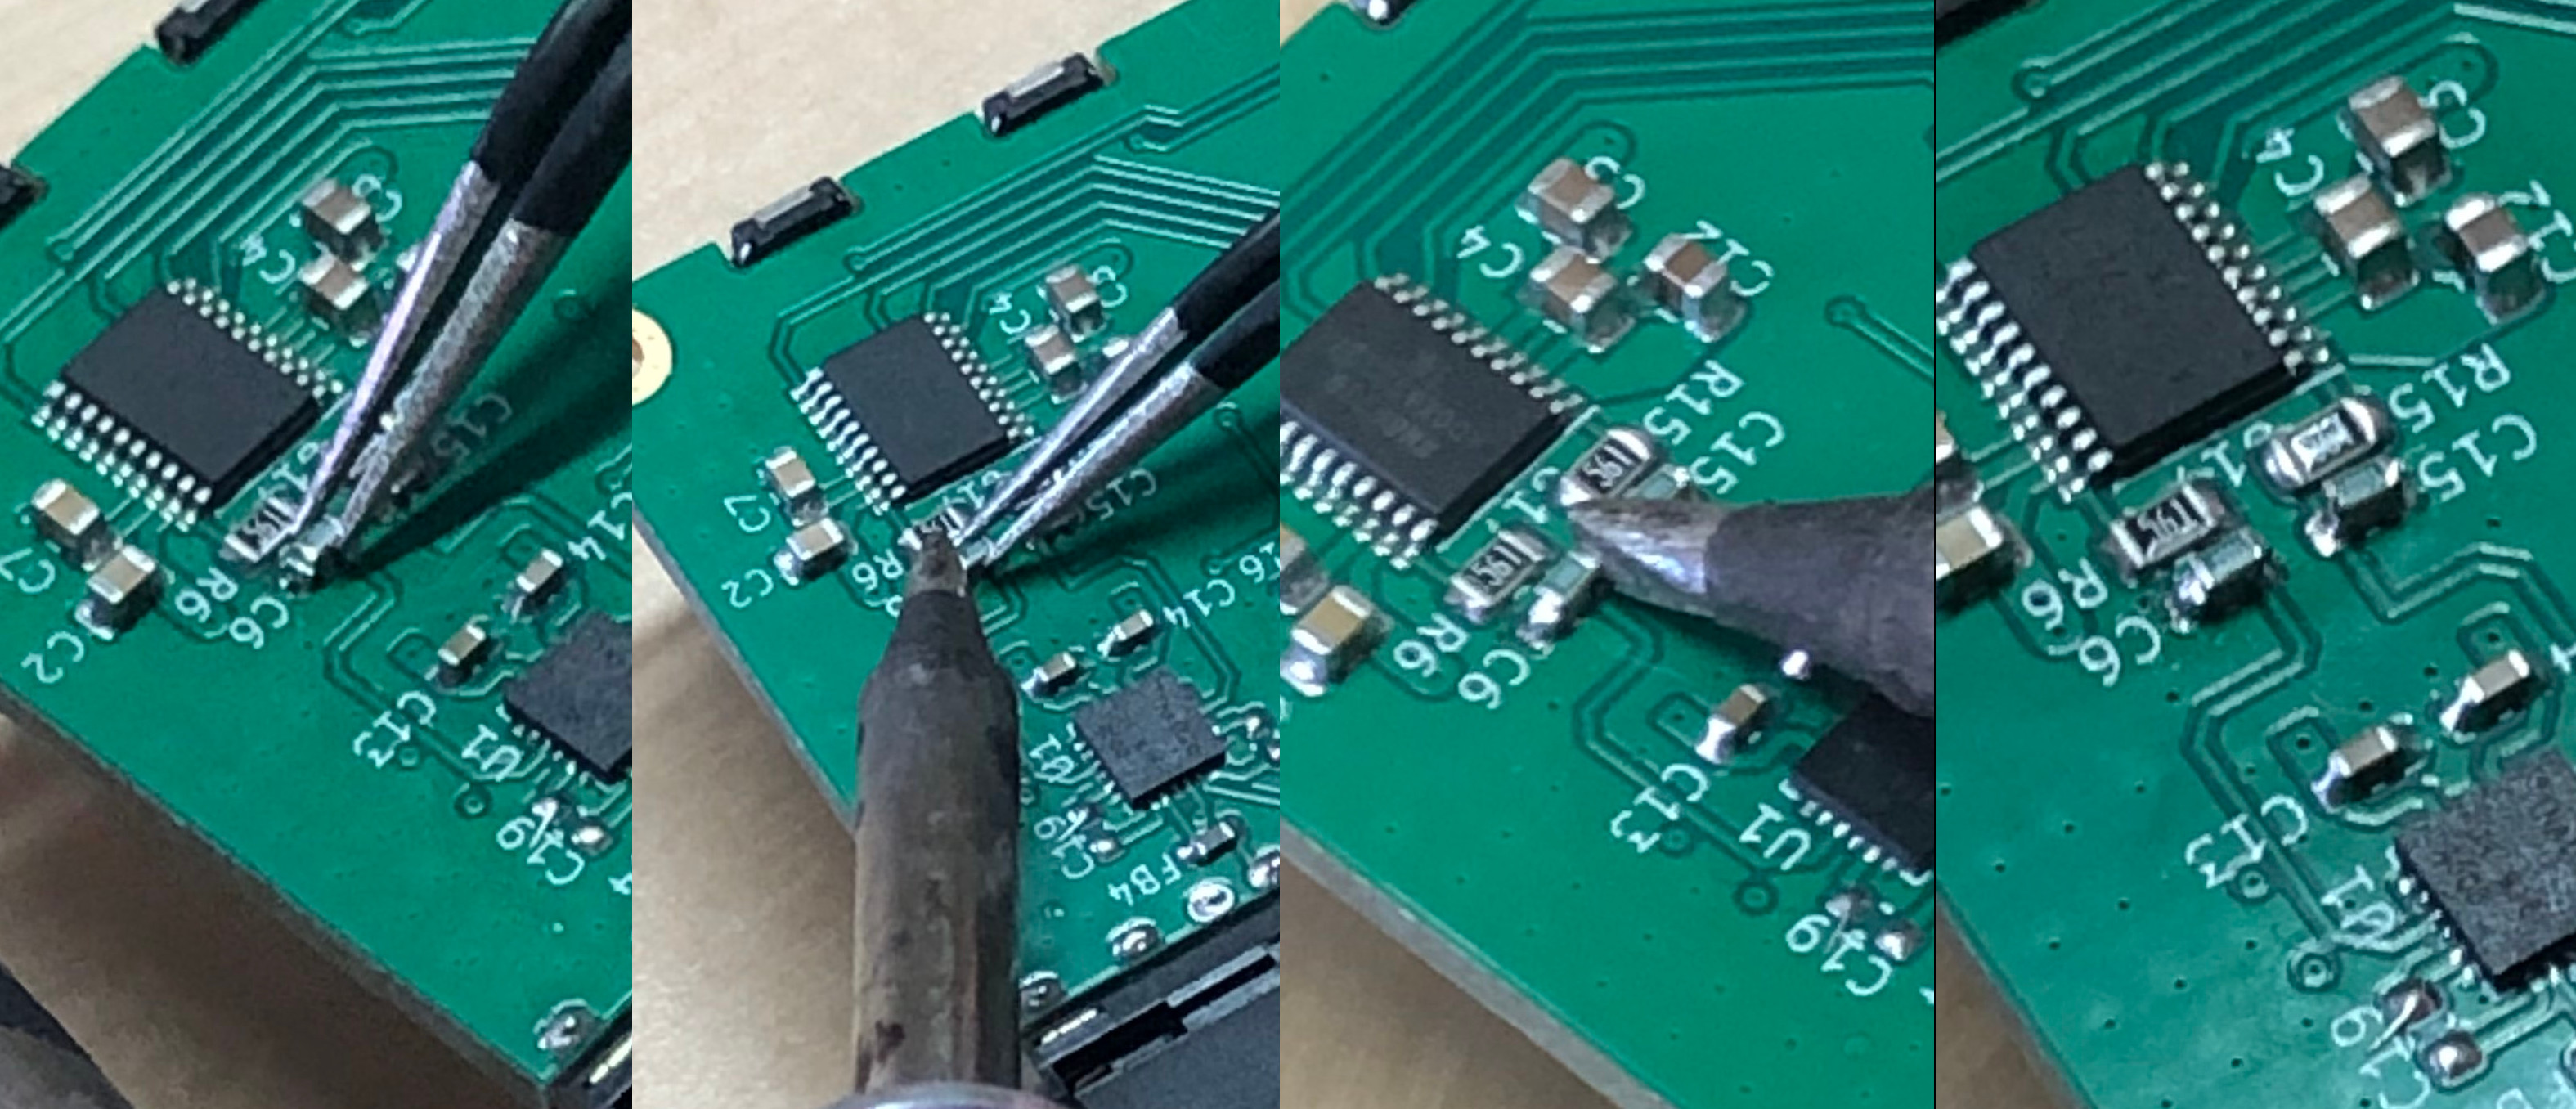
Soldering this together is fairly easy as SMD work goes, since we can place the new resistors directly on top of the capacitors:
Redoing my THD+N measurements with the mod in place, I got the same results as earlier, except that now my device's "0dB" point is a bit quieter than it was earlier. Finally, testing with my IEMs, there is now dead silence (to my ears, anyway) during very quiet playback.
Conclusion
I hope this update has been informative about not only Tangara's audio quality, but also discussions of audio quality in general. There is no perfect solution to high quality audio, but I think we've designed a device that strikes a good balance between quality, cost, and upgradeability.