This is a mirror of a campaign update originally posted on CrowdSupply.
Hey everyone, Daniel here again. At the time of writing this we just passed 2000% funded! Thank you all so much!
This week's update is about Tangara's support for the Lua scripting language. I'll talk a bit about what Lua is, describe what it can do, and share some fun examples of how you can control Tangara from a Lua console. Then Hailey will show off the desktop companion app she's been working on, which uses Lua to do some really cool things as well.
Lua on Tangara
We've previously said that, in striving to make a truly hackable music player, we accidentally created a really fun and useful development board. One place where this really shines is in Tangara's Lua support. By connecting your Tangara to a computer, you can use an interactive Lua session to run code directly on the device.
What Is Lua?
Lua is a scripting language similar to Python or JavaScript. It's a great first language as it's beginner friendly, has a lot of online resources, and is used in many different types of applications, especially in the worlds of game development and modding.
Control Your Device With Code
Tangara's UI is written in Lua, using the same APIs that are that are exposed through the serial console. What that means is that anything that Tangara's UI can do, you can do with code as well.
Let's go through an example of what that actually looks like. I'll start by connecting my Tangara to my computer with a USB Type-C cable, and use the screen program to connect to the serial console. Alternatively, you could connect using our companion app (more on that later).
Once connected, we can open an interactive Lua shell by using the lua command:
 → lua
Lua 5.4.4  Copyright (C) 1994-2023 Lua.org, PUC-Rio
luarepl 0.10 Copyright (C) 2011-2015 Rob Hoelz
>>
That >> is Lua's prompt, where we can write code and have it run directly on the device.
>> print("hello")
hello
Our Lua API allows us to directly interact with many of the firmware's features. For example, we can use the volume module to see the current volume and other related settings.
>> volume
{
  current_db = property { -9 },
  current_pct = property { 100 },
  left_bias = property { 0 },
  limit_db = property { -10 },
}
We can see here that current_pct is a property with a value of 100, meaning the volume is currently at 100%. Tangara's Lua API has many of these properties, which are values from the C++ firmware that you can inspect, modify (if the property is not read-only), and do data binding with. In this case, none of these properties are marked as read-only so we can use the set method to change their values. Let's try setting the volume to 60%:
>> volume.current_pct:set(60)
true
>> volume
{
  current_db = property { -40 },
  current_pct = property { 60 },
  left_bias = property { 0 },
  limit_db = property { -10 },
}
Not only has the current_pct value changed, but we can also see that the current_db value has updated to reflect the new volume as well. Now let's take a look at another module, the Bluetooth module.
>> bluetooth
{
  connected = property { false, read-only },
  devices = property { table: 0x3f939364, read-only },
  enabled = property { false },
  paired_device = property { nil },
}
The connected property describes whether or not Tangara is currently connected to a Bluetooth device. This property is read-only, meaning we cannot set the value of this property from Lua. It can only be updated from the firmware when a device is connected or disconnected – it wouldn't be very useful to be able to set connected to true if the device isn't connected to anything. To turn Bluetooth on, we can set the enabled property to true.
>> bluetooth.enabled:set(true)
>> bluetooth
{
  connected = property { true, read-only },
  devices = property { table: 0x3f93ec18, read-only },
  enabled = property { true },
  paired_device = property { table: 0x3f93f418 },
}
Here I was able to connect my Method ANC Bluetooth earphones by setting enabled to true, then the firmware automatically connects to previously connected devices, in this case my earphones. Checking the Bluetooth properties again shows that connected is now true.
Other Fun Examples
Controlling Playback
For properties and functions related to audio playback, we have the playback module.
>> playback
{
  playing = property { false },
  position = property { 0, read-only },
  track = property { nil, read-only },
}
To pause playback we can do something like playback.playing:set(false), and to begin playing again, we can do the same but with true instead of false. We could toggle play/pause by using a combination of get and set to get the current value, then set the new value to the opposite:
>> playback.playing:set(not playback.playing:get())
Adding Tracks to the Queue
This one is a bit more advanced, and explaining each element would be outside the scope of this post. As an example, though, here's how you might add all tracks from the database to the queue:
>> iterator = database.indexes()[3]:iter()
>> queue.add(iterator)
>> queue.size:get()
607
For more about database indexes and getting tracks from the database, you can check out the ldocs pages here.
Controlling Display Brightness
Changing Settings
You can use Lua to change many of Tangara's settings, including display brightness, volume, input control method, scroll sensitivity, and more. This not only gives you more control over your device, but also improves accessibility and reliability.
For those of you already familiar with Lua or willing to learn, this is another way we're giving you control over your device. Of course, we don't expect everyone will be comfortable with or interested in writing code. You can also change all of these settings from within the on-device settings screen.
The fact that these settings are available in Lua also means you can easily set them from Tangara's desktop companion app. Our friend Hailey has been doing amazing work on this, so I'll hand the mic over to her to tell you all about it. Take it away, Hailey!
Desktop Companion
Thanks Daniel :) Hailey here! I've been helping the team out by working on Tangara Companion – the desktop companion app for Tangara. Our vision for Companion is to make it as easy as possible to hack, update, and explore your Tangara, without first needing to become an expert on the commandline or wrangle a whole pile of commandline tools. We want Companion to be convenient for seasoned users while also providing a gentle on ramp for everyone else looking to learn how Tangara works.
Just like Tangara, Companion is hackable and open source, under the GPL-3 license. Companion is written in Rust, a programming language that makes it hard to make mistakes, and built with GTK, a desktop framework that originally came from the Linux world and that makes it easy to write gorgeous cross-platform apps without getting too snarled up in the details of the various platforms. This means Companion is fully cross platform too, and we'll be providing official downloads for all three major platforms: Linux, Windows, and macOS. We'll make it as easy as possible to compile yourself, if that's more your style, and if you happen to be an enthusiast of little-known operating systems, we'd also love to hear about your experience getting it going.
Let's dive in and see what Tangara Companion actually looks like:
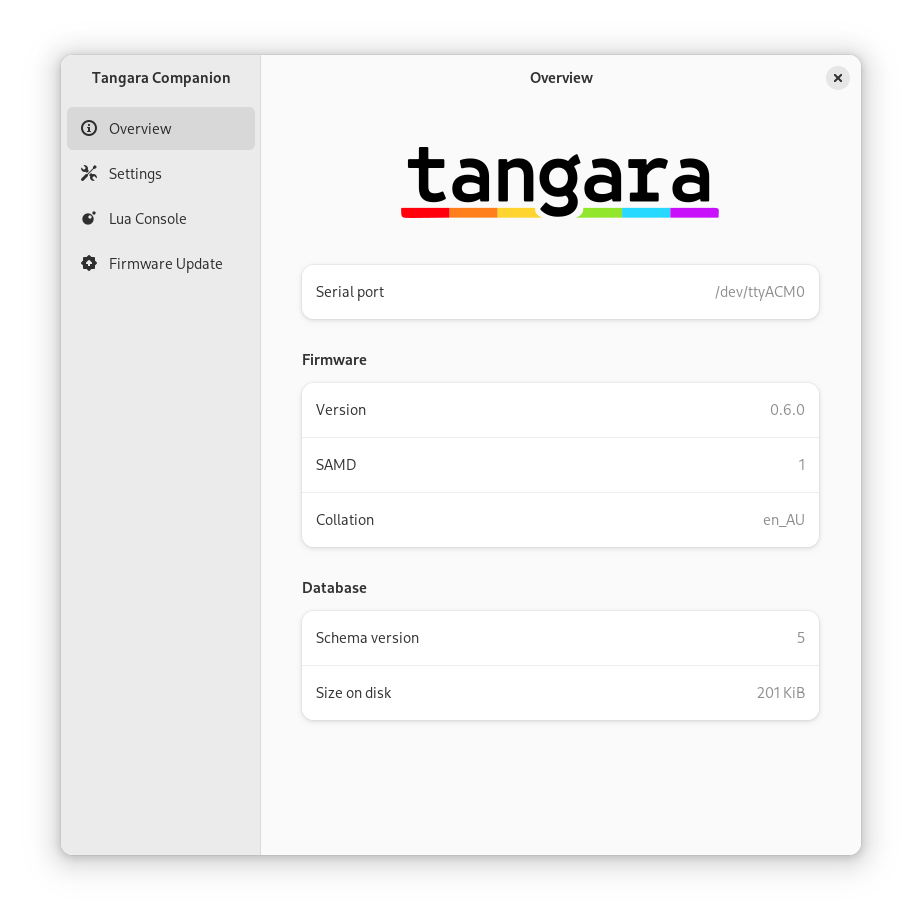
Straight away it shows a bunch of important details about your Tangara. Companion communicates with Tangara over USB Serial, and the serial port in use is shown. On my machine, that's /dev/ttyACM0, but on Windows for example, it'll be the familiar and enduring COM port. You don't actually need to know all about serial ports to use Companion, but we're building a hackable music player here, and it's just not in our nature to hide the details.
From the topic of this post, you might be able to guess how Companion retrieves the rest of the information shown on this screen. That's right – with Lua! Tangara's Lua environment is exposed over the serial console, and Companion uses the Lua console to talk to Tangara just like you would if you were exploring what Daniel talked about above. To retrieve the firmware version, for example, Companion sends the code require("version").esp() to the Lua console and reads whatever that function returns.
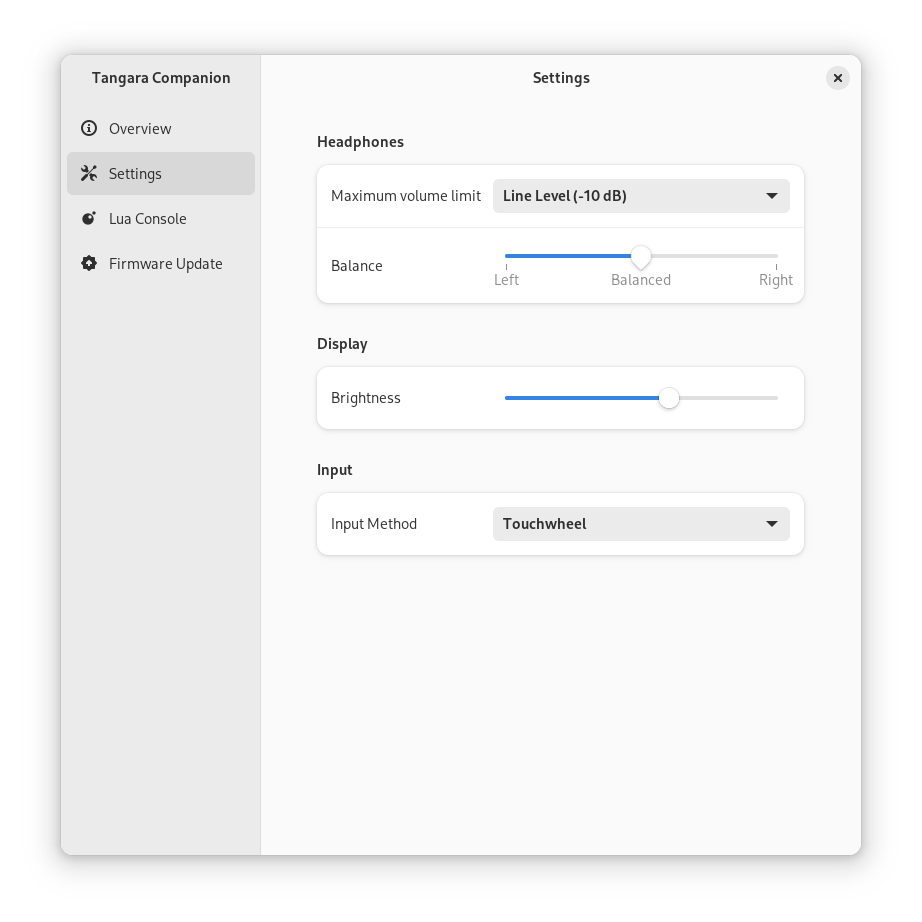
The settings page works the same way, and even uses the fancy data binding stuff that Daniel spoke of. All settings changes in Companion take effect immediately on Tangara. Likewise, all settings changes on Tangara are reflected live in Companion. When I first got the settings page working, it was extremely cool—and kind of magical—to see my Tangara's screen brightness change in real-time as I dragged the brightness slider up and down with my mouse.
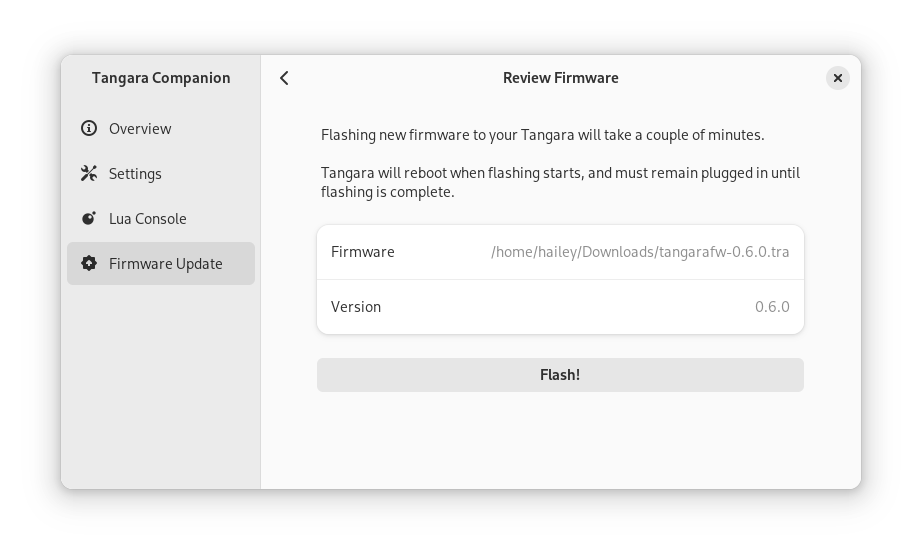
Finally, there's the Lua console and the firmware update pages. I won't go into the Lua console in this part of the post, since I'd just be repeating what Daniel has already said, but it's worth taking a look at how Tangara firmware updates work.
Firmware updates are distributed in a format we've designed specifically for Tangara—the Tangara Release Archive—which is also supported by Companion. This format is really simple. A Tangara Release Archive is just a ZIP file that contain binary images to be flashed to Tangara and a tangaraflash.json manifest that lists each binary image and its address in ROM:
{
    "version": 0,
    "data": {
        "firmware": {
            "version": "0.6.0",
            "images": [
                { "addr": 65536, "name": "tangara.bin" },
                { "addr": 11599872, "name": "lua.bin" }
            ]
        }
    }
}
Hitting the flash button will take care of it all, and pretty soon you'll have a freshly updated Tangara! Happy listening :)