This page contains instructions for flashing new firmware versions onto your device, including how to recover from failed flashes via the desktop companion app.
In general, we recommend that most users update their firmware via the Tangara Companion app. However, there are cases where this may not be possible.
Using the companion CLI
In addition to the graphical companion app, there is a also a lighter weight command-line flashing tool available. Binary releases of this tool can be found in the same 'releases' page on GitHub as the graphical tool.
The source for the CLI can also be found as a crate in the graphical companion's git repository.
Building from source
As the CLI has much lighter weight dependencies, building a version from source is quite straightforward if you already have a rust toolchain available on your system.
$ git clone https://github.com/haileys/tangara-companion.git
$ cd tangara-companion
$ cargo run --package tangara-cli
tangara-cli 0.4.3

USAGE:
    tangara <SUBCOMMAND>

FLAGS:
    -h, --help       Prints help information
    -V, --version    Prints version information

SUBCOMMANDS:
    flash
    help     Prints this message or the help of the given subcommand(s)
If you want to install the CLI tool:
cargo install --path crates/tangara-cli
Flashing
Once you've downloaded or built the Tangara CLI tool, flashing is very straightforward. Simply plug in your device, ensure the lock switch is in the upper position, and pass the CLI tool the new firmware file you wish to flash:
$ ./tangara flash ~/Downloads/tangarafw-1.0.1.tra
Alternatively, you can use cargo run without installing the CLI tool:
cargo run -p tangara-cli flash ~/Downloads/tangarafw-v1.0.1.tra
Manual flashing
If for some reason the Tangara-specific flashing tools are not viable for you, or you're just a nerd that loves playing with ESP32s, then you can instead flash new firmware using standard ESP32 tools available from Espressif. There are several tools available with instructions detailed below. For all of those tools, you'll first need to extract the contents of the .tra firmware bundles; these are really just zip files:
$ unzip tangarafw-1.0.1.tra
Archive:  tangarafw-1.0.1.tra
  inflating: tangaraflash.json
  inflating: tangara.bin
  inflating: lua.bin
(If you're not comfortable with command-line tools, you can also just rename the .tra file to a .zip file and use a graphical extraction tool.)
Next, you will need to consult the tangaraflash.json manifest to check where the included binary images should be flashed:
$ cat tangaraflash.json
{
    "version": 0,
    "data": {
        "firmware": {
            "version": "1.0.1",
            "images": [
                { "addr": 65536, "name": "tangara.bin" },
                { "addr": 11599872, "name": "lua.bin" }
            ]
        }
    }
}
(Again, if you're not comfortable with the command line then a program like Notepad will open tangaraflash.json just fine.)
In this example, tangara.bin should be flashed at address 65536, and lua.bin should be flashed at address 11599872.
Using espflash
Follow the installation instructions for esptool.
Plug in your Tangara with the lock switch in the upper position and run:
espflash write-bin 65536 tangara.bin --baud 1000000 && espflash write-bin 11599872 lua.bin --baud 1000000
If you get permission denied errors on Linux, ensure your user has permission to access the serial port.
Using a web tool
There are several web versions of esptool available, which allow you to flash ESP devices from Chrome-based web browsers. These instructions are written with Espressif esptool.js in mind.
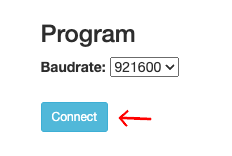
First ensure that your Tangara is plugged in, with the lock switch in the upper position. Then, in the Program section of the page, click 'Connect'.
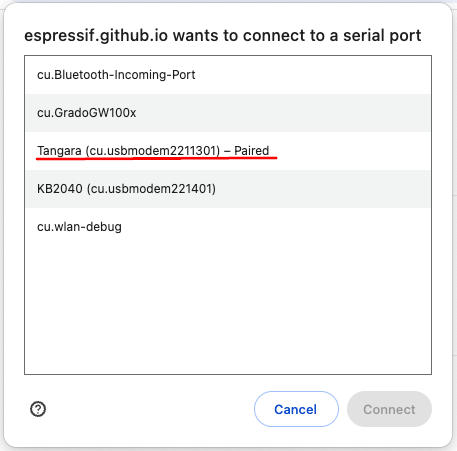
From the dialog that appears, select your device. It should be called something like 'Tangara'.
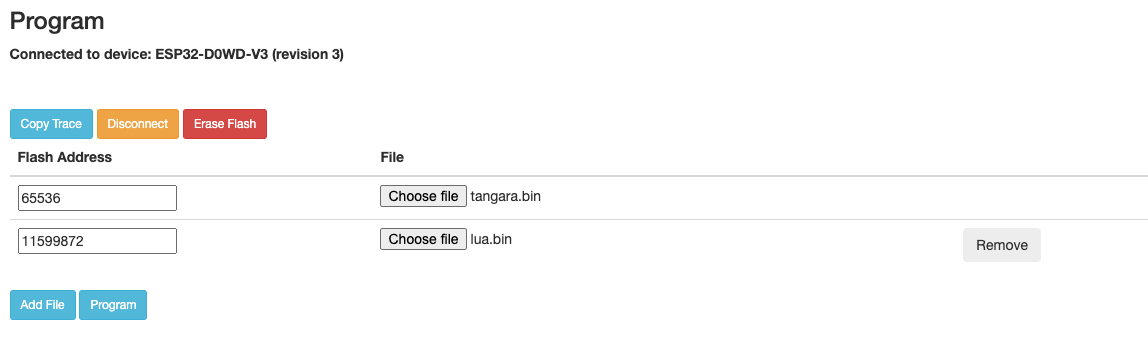
Then, configure the flash addresses and files according to the information from tangaraflash.json:
Wait for the console output to finish, then click 'Disconnect'. Your device is now flashed, but still need to be properly rebooted.
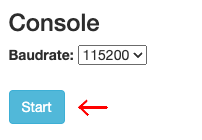
In the Console section of the page, click 'Connect'.
Select your Tangara from the list that appears, as before.
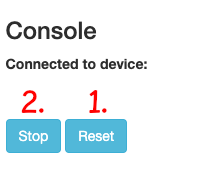
In the new page that appears, first click Reset (it will seem like nothing happened), then click Stop.
Your Tangara should now boot up into the newly flashed firmware.
Using esptool.py
Using esptool.py, we can flash all images and reboot the device from a single invocation:
esptool.py --port /dev/serial/by-id/usb-cool_tech_zone_Tangara_* write_flash 65536 tangara.bin 11599872 lua.bin
Note that the --port argument may vary on your system. In some cases, you may be able to omit this argument completely and rely on esptool to detect the correct serial port to use.
Recovery and Initial Flashing with idf.py
The above flashing methods only reflash the main C++ firmware and Lua partitions on your device. If your device has never been flashed, or if your device seems 'bricked' an a way that the above methods have not been sufficient to recover, then you may wish to perform a complete flash of your device using idf.py.
Build the Tangara firmware and run:
idf.py flash
in the firmware repository with your Tangara plugged in. The tangara.bin and lua.bin files that get flashed in the other methods will be flashed, but this method also includes several other binaries such as the bootloader and partition table that don't change between Tangara firmware releases.