Device controls
Tangara's default control scheme uses the capacitive touch control as a wheel. Move a finger or thumb around the circle clockwise to scroll down, or anticlockwise to scroll up. A tap in the centre of the wheel is used to activate the currently selected item.
Shortcuts may also be activated by long-pressing one of the cardinal (up/down/left/right) directions on the wheel. By default, long-pressing on the left of the wheel will take you back to the previous screen, and long-pressing on the top or bottom of the touchwheel will allow you to scroll very quickly.
To adjust the volume of your device, use the two buttons located on the left side. These buttons can also be used for navigation or media controls. See Control Schemes for more information.
Hard Reset
If for any reason your device becomes unresponsive during use, you can force a hard reboot with the following key combination:
- Start with the lock switch in the upper (unlocked) position.
- Press and hold both volume buttons simultaneously.
- Whilst continuing to hold the volume buttons, toggle the lock switch to the lower (locked) position, then back to the upper (unlocked) position.
This sequence should force a reboot of the device even when the on-screen interface is completely unresponsive.
Loading your music
First, you will need to prepare an SD card with an appropriate filesystem for Tangara. Any kind of SD card should work fine, so long as it is formatted with a FAT filesystem (e.g. FAT32, or exFAT).
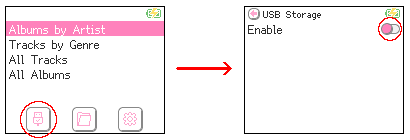
If you have a large music collection, then you may want to consider loading your music onto your SD card using a separate USB-to-SD adapter, as Tangara's USB storage interface has a limited speed. Otherwise, you can insert your SD card directly into your Tangara, then plug your Tangara into your computer. You will then need to enable 'USB Mass Storage' via the Settings menu.

When loading your music onto the device, we recommend placing your files within a 'Music' subdirectory on the root of your SD card. This will make it easier for your device to distinguish different kinds of media content.
Once your music has been added to the device's SD card, your Tangara should automatically scan for the added tracks and add them to its internal database. If you wish to manually scan for new tracks, or disable automatic scans, you can do both of these via the 'Database' page within the Settings menu.
Recommended directory structure
Directory structure is case insensitive. You can omit every single directory. It is intended to be configurable in the future.
tangara_sd_card
├── .themes
├── Audiobooks
├── Music
├── Playlists
└── Podcasts
For .themes specific information, please see themes documentation.
Supported audio codecs
See Music Library for documentation on the music formats currently supported by Tangara, as well as advice for organising your digital music collection.
Updating your device
Tangara's firmware is under active development, and we release a new version about once a month. These releases can be round in the 'Releases' tab of the 'tangara-fw' repository on Codeberg.
Each firmware release is a .tra file, which can be flashed using the Tangara Desktop Companion. Alternatively, you can use the tangara CLI tool or manually flash with ESP32 flashing tools.
For developers
Tangara's firmware is developed in C++ and Lua, using the ESP-IDF framework. You can download the sources for this firmware from our source repository on Codeberg. See the BUILDING.md file in this repository for full build instructions.
For ease of development, the Tangara's SAMD21 co-processor implements a USB UART bridge that is compatible with all standard ESP32 development tooling. You can download the sources for the SAMD21 firmware from Codeberg as well. The README.md in this repository contains basic environment setup and build instructions.